Saturday, October 23, 2021

Capitol Gorge to Waterpocket Canyon Overlook...and Eastern Approach: Capitol Reef National Park

Essence: This hike has three components. Walk through Waterpocket Fold within the confines of Capitol Gorge while stopping to view historic inscriptions etched through the ages. Exit from the canyon on an old trail that ascends to a ridge crest and then disappears. A long, gradual, scenic ridge climb transports you to the slickrock. Hike over Navajo Sandstone to a monolith overlooking Waterpocket Fold's eponymous canyon. Roam freely from there. This hike is primarily off-trail and navigation is demanding. You must have extensive experience using subtle landscape markers to find your way. It would be all too easy to get irretrievably lost out there. Note: See the end of this post for a second hike that explores Waterpocket Canyon via the eastern slope of the Fold.
Travel: From the Visitor Center and UT-24, drive south on Scenic Drive. Pass by the campground, the Grand Wash turnoff, and go over the Slickrock Divide. In eight miles, Pleasant Creek Road branches to the right and the paved road transitions to graded dirt. Upon entering Capitol Gorge the road is squeezed between constricted towering walls. Park in a large lot at 10.2 miles. During moderately busy days the lot fills by mid-morning. Pit toilet and picnic ramada, but no water.
Fruita Campground: This idyllic, shady campground is adjacent to the Fremont River, tucked amongst historic fruit orchards. In 2018, the campground initiated a reservation system. The 71 sites are first-come, first-serve November through February. There are bathrooms, fire grates, picnic tables, and water. Park facilities are open year-round. See the park website for current fee information and a link to the camping reservation system.
Distance and Elevation Gain: 11.3 miles as described; 1,850 feet of climbing
Total Time: 6:00 to 8:00 
Difficulty: Primarily off-trail; navigation challenging; Class 2; flash flood hazard in Capitol Gorge; carry all the water you will need and hike on a cool day.
Maps: Golden Throne, UT 7.5' USGS; Hiking Map and Guide: Capitol Reef National Park
Reference: Capitol Reef National Park: The Complete Hiking and Touring Guide, by Rick Stinchfield. Excellent introduction to hikes, drives, and natural history of the park. Purchase at the Visitor Center.
Latest Date Hiked: October 23, 2021
Quote: We met in these lost, rugged landscapes and slipped in as if we belonged there, hoping to be swallowed. 
Craig Childs

Steps up and away from Capitol Gorge is a scenic ridge overlooking a stone wilderness. The earth pitches vertically to create buttresses (Golden Throne is image-center), pulses through hidden canyons, and rears up into folded fins and geodesic polyhedrons. (Thomas Holt Ward, photo)

Route: Walk northeast downcanyon in Capitol Gorge until the walls begin to dissipate. Bear southwest on a subtle trail and when it disappears, continue southwest on a broad ridge. Upon reaching the first Waterpocket Canyon overlook at 6,020 feet, bear south on the rim. Locate a safe drop into the south tributary at about 6,220 feet. Free range over Navajo Sandstone to the monolith overlooking Waterpocket Canyon.

Capitol Gorge
The Golden Throne and Capitol Gorge trails leave from different locations in a shared parking lot, elevation 5,420 feet. Walk through the picnic ramada and locate a trail heading down the canyon skimming along the north wall. The grinding determination of water has pushed the sandstone walls towering roughly 800 feet overhead into a wide stance.

A word about mileages: GPS units can get glitchy in deep canyons so your readings may vary from those posted here. Use landmarks as your guide. 

Visit a petroglyph panel at 0.2 mile attributed to the Fremont Culture (300-1300 Common Era). The images have grown faint from weathering but a sunburst image stands out. The anthropomorphic figures have trapezoidal-shaped bodies elaborately decorated with horned headdresses, ear bobs, and necklaces. 

In another tenth of a mile, the names of six surveyors (see Rick Stinchfield, referenced above), are deeply etched on a varnished slab fifty feet up the south wall. How did they make that happen?

The trail steps down into the channel and disappears. Ephedra, small junipers, and buffaloberry cling to the side walls as the gorge constricts to about 25 feet at half a mile. Flash floods have picked up boulders and spit them out the chute or ground them up leaving an uncluttered, flat-bottomed, fine-grit floor. Pebbles carried by the surge are deposited in Tafoni pockets, enhancing nearly vertical walls. (THW, photo)

The Pioneer Register, designated on the Golden Throne quad, is inscribed on the north wall at about 0.8 mile. Rick Stinchfield found an inscription dating to 1871, "...a time when the late explorers were giving way to early prospectors." The boldly pecked signature of Cass Hite (1845-1914) precedes the fancy cursive names that follow. Hite lived and died in Glen Canyon prospecting for gold. He’s buried in Ticaboo Canyon under the waters of Lake Powell.

Pass the signed junction with the popular trail to The Tanks at 1.0 mile. If you have time, hike up to the stone pools on your return. The intersect of Waterpocket Canyon and Capitol Gorge is directly across from The Tanks. The Waterpocket Canyon overview at 6,020 feet is image-left. 

Capitol Gorge is a conduit through Waterpocket Fold. Nearing the east-dipping side of the monocline, walls widen and aprons of fluted pink rock flow out covering the floor adorned with colorful pebble mosaics. A concrete check dam spans the bottom of the canyon at 1.7 miles. You will see periodic evidence of the original Highway 24 roadbed that passed through Capitol Gorge continuing on to Notom. The existing highway along the Fremont River was constructed in 1962. Watch carefully for cowboy signatures and brands painted in black on the north wall at 2.0 miles.

Ridge and Rim
It takes an intuitive eye for trails to locate the exit from the canyon at 2.3 miles, 5,260 feet. It is on the south side of the gorge, just west of a small side canyon. If you come to another check dam, steps downstream, back up and look again. This is the only safe egress from the canyon. Furthermore, you must be able to retrace your steps back to the upper end of this trail upon your return. 

The trail doesn't quite come to the floor. Look for the thin track going up through red earth. The faint path does a rising traverse to 5,400 feet and then turns south, tracking the east wall of a ravine. The trail disappears on a small flat. We set a couple of cairns at critical junctures but we've done that before and those cairns were toppled. Turn southwest and climb 100 feet to gain the principal access ridge.

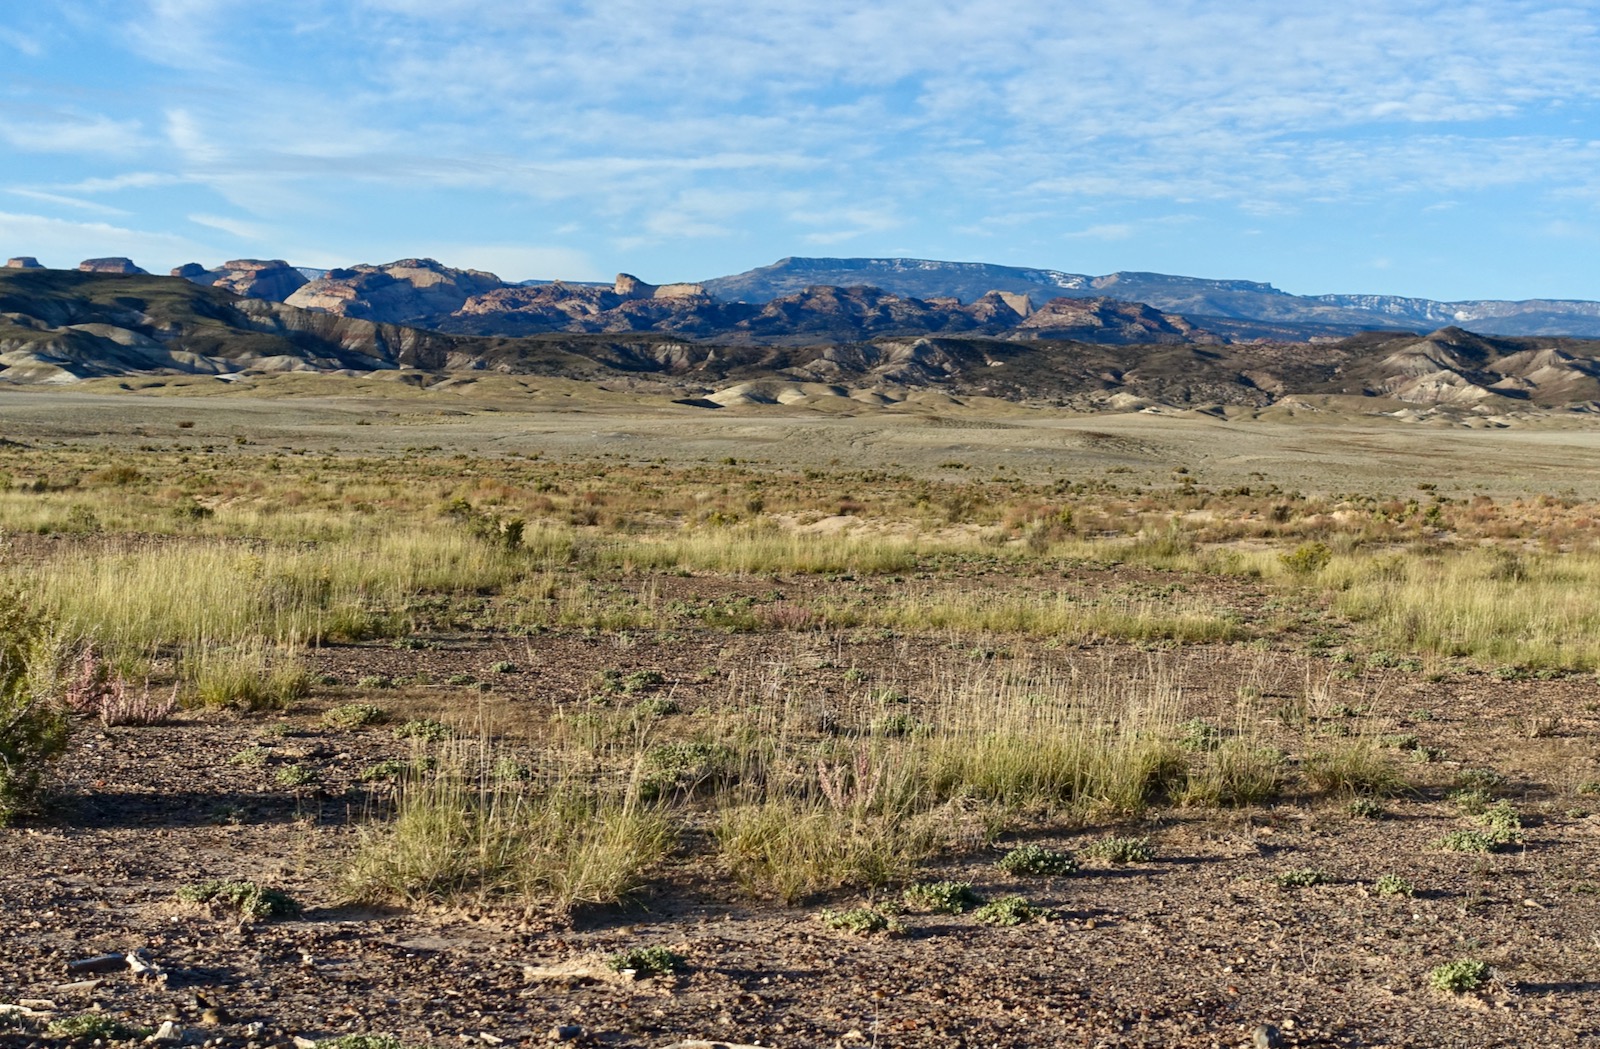
Once out of the canyon corridor there are astounding views of the Henry Mountains.

Reach an overview of Capitol Gorge at 2.7 miles, 5,580 feet, shown. From there, walk south-southwest up the subtle ridge. There are a complex series of ridges and ravines and nothing distinctive about any of them. While they pose no difficulty on the ascent, the ridges have the potential to draw you in the wrong direction on your return. All of them terminate in cliffs with the sole exception of this access ridge. Set cairns or carry a reliable GPS unit. 

Walking is easy on the softly rolling terrain. Piñon-juniper, sagebrush, and ephedra grow in the rich soil covered in shattered sandstone chips. All along the way are uncommon views of Golden Throne. To the west, two bighorn rams crossed a flat. A golden eagle with silent wings was tailed by a furiously flapping raven. Cross over Point 5,770' at 3.3 miles where the ridge briefly necks down between two unnamed ravines. 

Showy four o'clock typically blooms in the park in early summer. This robust plant, protected by a juniper, was in full blossom in late October. (THW, photo)

You will reach the rim of Waterpocket Canyon at about 3.7 miles, 6,020 feet. Earth forms are sculpted from the massive character of Navajo Sandstone. Formidable pouroffs and cliffs, linear streams of fins--this stone world, so close at hand, is nevertheless achingly inaccessible.

Do a short Class 2 downclimb through gray plates and then track above the south tributary of Waterpocket Canyon at 4.1 miles, 6,060 feet. The 400-foot unscalable wall of the side canyon is illustrative of the fierceness of this terrain. 

The two times we did this hike, we were racing rain so our intent was just to see how far we could get before the weather closed in. We had no end game. As we approached big swaths of sandstone we could see a yellow monolith on top of a sandstone rise and "Stele Point" became our driving motivation and goal. It wasn't at all clear we could achieve it. The ponderosa grove seen in the image below is in the upper reaches of the south tributary.

The marker for the descent from the ridge and onto the sandstone is the "Egg Nursery," shown. Beyond, the ridgecrest is topped for a short distance with big sandstone blocks. You may initiate your descent before or immediately after the blocks. At the time, we were unaware this was the best exit from the ridge so we climbed another 200 feet over 0.3 mile. 

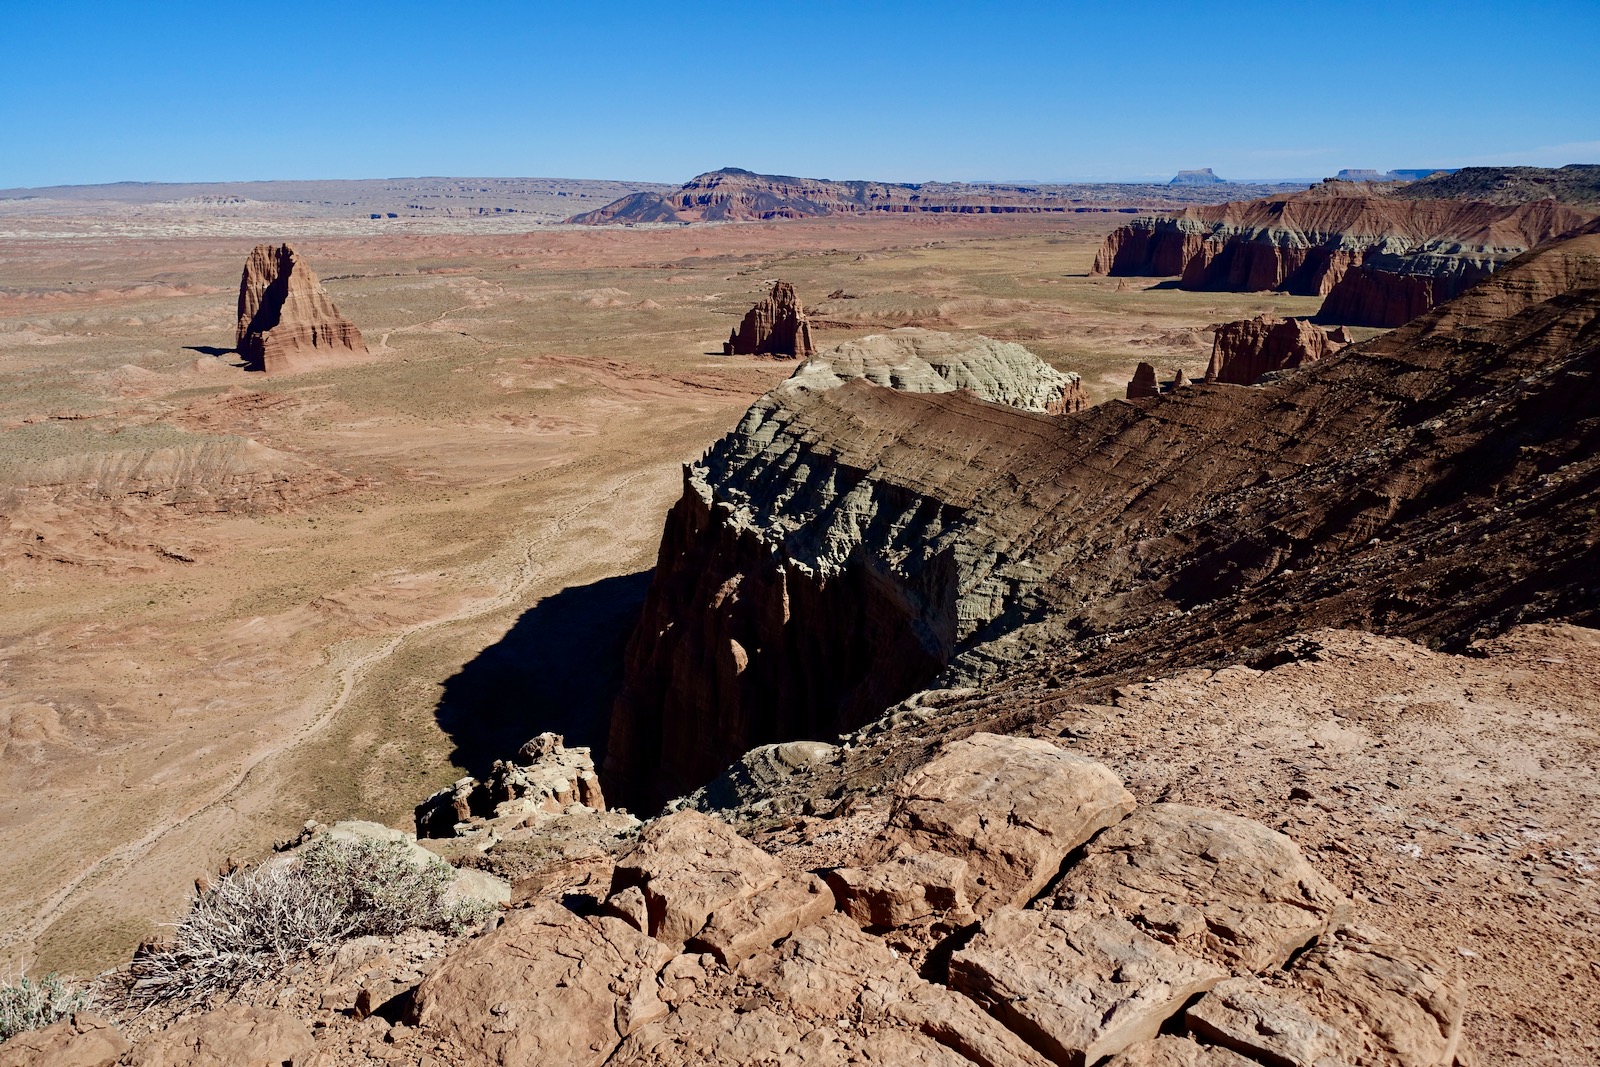
The ridge terminates at an impassible cliff at 4.7 miles, 6,420 feet. The vista opens to a startling and colorful slickrock world. Point 6,530', image-left, is the tallest feature on the north wall of Pleasant Creek, a radical 800 feet below (and out of sight). 

We backed down to the big block area and found safe passage off the ridge--what a joyful gift! A 100-foot descent put us on the floor of the south tributary. 

Navajo Sandstone
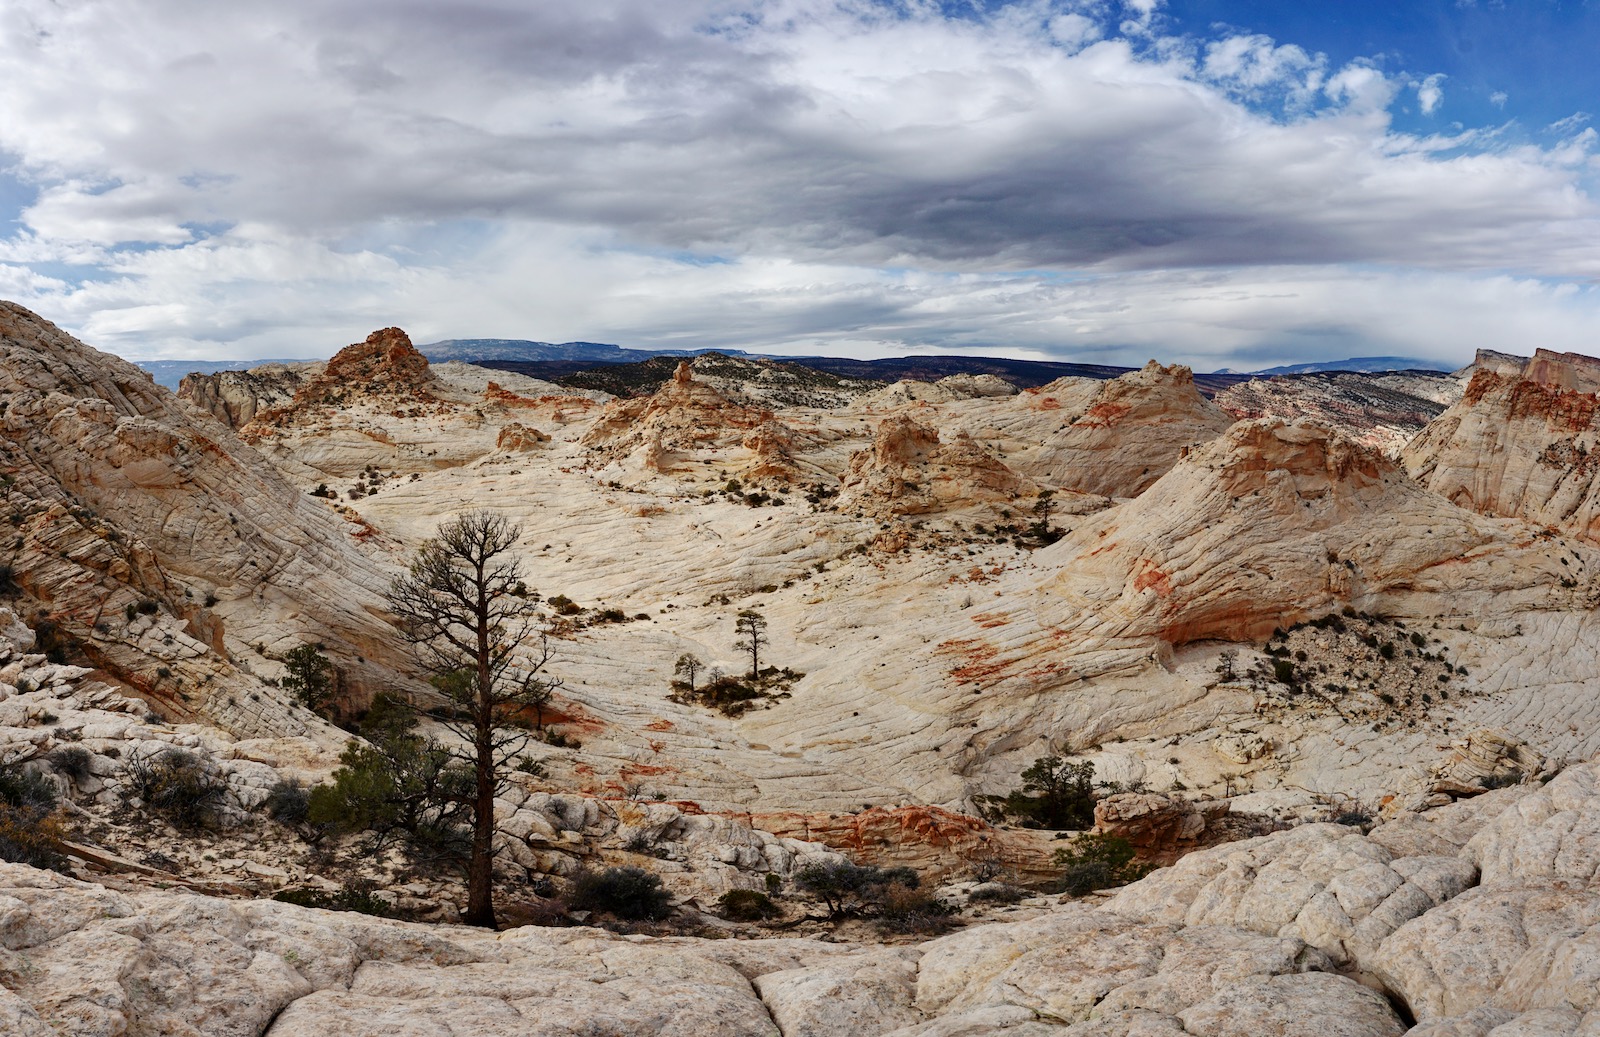
Yes, it was a five-mile trek to the slickrock but for those of us who love wandering on Navajo Sandstone, this landscape is paradisiacal. Linked circular waterpockets cascade for great distances before terminating in garden oases. After recent rain, the tanks were flush with water.

The monolith is just a stroll away across the profusely jointed polygonal surface.  (THW, photo)

Iron concretions are scattered on the bedrock. As you approach the monolith, they transition to square-sided iron boulders. 

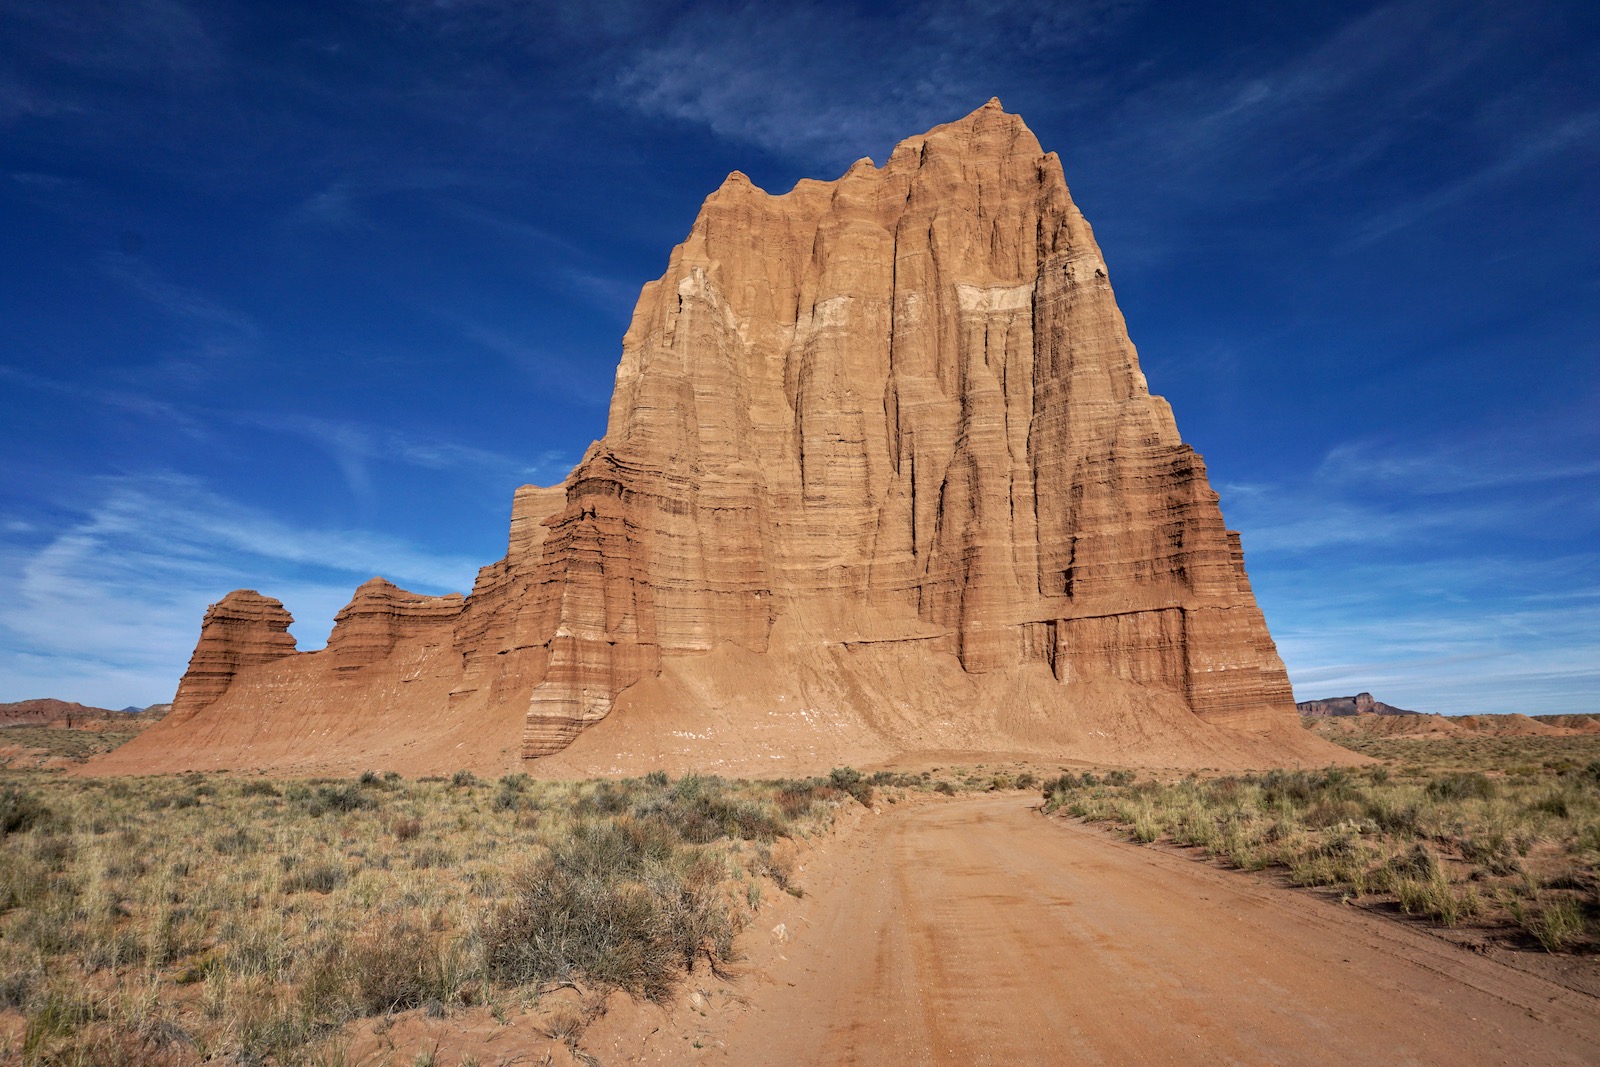
At 5.6 miles, 6,540 feet, we arrived at the monolith residing on the rim at the head of Waterpocket Canyon. 

Looking at the image below, Waterpocket Canyon is tucked out of sight in the foreground. Golden Throne is image-center. Weather was rapidly approaching from the northwest so our explorations were truncated. Next time, we'll probe for a route into the canyon. (THW, photo)

This image looks east to the abrupt end of our access ridge. (THW, photo)

Our plan is to return in the spring to explore this complicated sandstone swale located south and east of the ridge. (THW, photo)

The Return
There is only one route back into Capitol Gorge and that is the one you came in on. So do the short climb back to the access ridge and begin your descent. A couple of cautionary notes: At 6,040 feet, the ridge splits. Point 6,037' to the right is tempting--avoid it by continuing straight north. 

Upon reaching the Waterpocket Canyon overview at 6,020 feet, make a hard turn to the east. Next time we will set a large cairn there because we blew right by this critical juncture. We were so spellbound by the evolving vista from the rim we were not paying attention to navigation. I intentionally left this mistake on the map above because it illustrates how confusing the ravine-riddled landscape can be. The mileage posted reflects this extra jaunt. 

Upon reaching the floor of Capitol Gorge, consider a worthy side trip. Walk downcanyon a quarter of a mile to the park boundary. There you will find a relic from the past, an historic car weighed down with rocks. The signage on the driver's door reads, "Scenic Attraction Entering Capitol Reef National Monument." (THW, photo)

Waterpocket Canyon Via Eastern Slope of the Fold

Essence: With a lengthy shuttle it would be possible to do a thru-hike from Capitol Gorge to the Waterpocket Canyon Overlook and conclude at Pleasant Creek near the Notom Road. Absent a shuttle, there is merit in doing two hikes from different trailheads. This approach from the east offers a shorter route to the slickrock and plenty of time to explore Waterpocket Canyon.
Travel: Measure from UT-24 and Notom Road. Drive south for 5.9 miles and turn west on BLM 0151. Stay on the main track. The road is sandy in places and 4WD is recommended. At 6.6 miles go right at the fork onto BLM 1511. We parked on a piñon-juniper flat with dispersed camping at 6.9 miles but we could have kept going straight another 0.4 mile, or even to Pleasant Creek.
Distance and Elevation Gain: 9 miles minimum; about 1,800 feet; your statistics will vary.
Total Time: 6:30 to 8:00; allow for a full day of roaming.
Difficulty: Off-trail; navigation challenging; Class 2+ with no exposure
Map: Golden Throne, Utah 7.5' USGS Quad
Date Hiked: April 24, 2022
Route: Cross Pleasant Creek, head north and then west in a tributary. Ascend southwest on sandstone bypassing various obstacles. From Saddle 6,420’ hike north to Waterpocket Canyon Overlook and Monolith. Descend into Waterpocket Canyon and explore freely. You may vary your exit route in the upper reaches but it is imperative that you return through the approach drainage. The blue line represents the hike described above.

From our parking location on the juniper flat, elevation 5,580 feet, we could see some of the hike’s key landmarks. The broad sandstone bowl to Point 6,530’ is image-left. Saddle 6,420’ is on the rim to its right, and the yellow monolith is image-right. Whether you walk or drive, stay straight on the incoming road at BLM 1513 and descend 0.8 mile to Pleasant Creek. Mileages are calculated from the wash crossing.

In April, 2022, Pleasant Creek had been siphoned into an irrigation ditch and the major drainage was dry. The wild river is capable of carrying a load of basalt boulders. The road crosses the wash and then climbs a short hill. Look to your right for an irrigation gate. Leave the road, hop across the channel and walk north about a quarter of a mile to a west fork of Pleasant Creek. There is no trail and this short stretch is somewhat confusing. Walk parallel to the ditch on either side. It is brushier adjacent to the flowing water and dryer a few paces west.

Now in the tributary, it splits at 0.8 mile. Turn left/southwest with the main branch. The wash bed is a mix of sand and pale gray shattered stone plates. Elder juniper gather on the banks of the ephemeral stream.

Leave BLM property and enter the National Park at 1.1 miles. The boundary isn’t signed but there’s a steel post and wire fence strung up off the ground you can easily duck under. Round the corner and the narrow tributary expands into a wider shallow canyon. Step onto the slickrock and it’s immediately gorgeous with pools and drops. Many waterpockets are small, deep, and hidden in shadow. Other tanks are sunny and significant. Old-growth conifers tend their gardens enhanced with iron concretions.

A series of pouroffs and other assorted obstacles begins at 1.4 miles. Often there is more than one bypass option. Puzzling out how to defeat each obstacle is a welcome challenge.

Climbing to the saddle north of Point 6,530’ is pure pleasure but if your objective is to take the shortest route into Waterpocket Canyon, or the thru-hike to Capitol Gorge, you can take a short cut. Leave the main canyon at about 2.2 miles and ascend northwest up the defile shown. We returned on this route and were able to manage the friction pitch west of the boulder-filled gully.

The hiker below is ascending to the 6,420-foot saddle.

There is a band of fragile fins spanning the bowl. Please walk around them as my partner is doing. Given the delicate fins, the carmine-saturated sandstone, and the Utah blue sky, the visual field is too much to process.

From the saddle at 2.7 miles there’s an excellent view down into Pleasant Creek which has carved a deep trench through the Fold over geologic time. The seven fin domes high above the south bank are anchored by Point 6,757’.

Our next goal was the monolith that is the turnaround for the hike described above. We transferred into the next basin losing about 200 feet of elevation. You may be able to ferret out a route much closer to the rim.

We walked by a remarkable arrangement of iron-red stone both ascending and descending.

We reached the yellow monolith at 3.8 miles; your mileage will no doubt vary. The image below looks into upper Waterpocket Canyon.

We were hiking with a friend who previously discovered an access drop into the canyon. From the monolith, retreat south less than 0.1 mile and look for a weakness in the west-facing cliff with a large fallen tree in the crack. Work your way intuitively to the canyon floor. (Thomas Holt Ward, photo)

From there the possibilities are endless in the upper reaches of Waterpocket. We hoped to find a descent route into Pleasant Creek so we ascended south through an expansive sandstone bowl. We stood on the divide at 4.4 miles, 6,460 feet. It was impossible to determine visually whether we could make the entire drop without getting cliffed out. Perhaps we’ll return to try it from the bottom. The hikers below are looking for a descent route from the picturesque divide.

We climbed back through the crack with the helpful log to the vicinity of the monolith. For the return, you must be 100% positive that you are descending in your upcoming canyon. There are a number of equally appealing draws that could easily deceive you. The image below was shot from the 6,420-foot saddle looking down-canyon east. You need not reclimb to the saddle but you do need to work back into the canyon shown.

I'd like to thank our friend Dan Honig for navigating this route and for guiding and accompanying us on this hike.

Friday, October 22, 2021

Cathedral Valley: Capitol Reef National Park

Essence: Landforms in the Cathedral District diverge significantly from those found elsewhere in Capitol Reef National Park. Streams of fluted cliffs, free-standing monoliths, and impossibly smooth-sloped, colorfully banded mountains create a landscape at once sublime and bizarre. Most travelers drive the Cathedral Valley Loop in one day. During our visit, weather and road conditions were optimal so we spent two days covering the territory and did seven of the hikes posted in park literature. Each evening we exited to the west from Hartnet Junction and returned to the Fruita Campground. Cathedral Valley was named in 1945 by Charles Kelly, the first superintendent of the park. The roads and surrounding countryside outside the park boundary are managed by the Bureau of Land Management.  
Travel: The Cathedral Loop, including spurs to trailheads, is unpaved for 67 miles. A 4WD vehicle with high clearance and sturdy tires is required. Roads are not plowed in winter, they are impassable when wet, and have stretches of deep sand when dry. Vehicles must ford the Fremont River at the south end of Hartnet Road near UT 24. Do not attempt to cross during periods of high water. Reconnoiter and, if safe, commandeer the ford at the beginning of your drive, not the end. The road heading west over the mountains from Hartnet Junction may be troubled with snow and mud during the shoulder season and closed in winter. Check with the Visitor Center for the latest on road conditions. I posted our odometer readings but your mileage is sure to vary. 
Fruita Campground: The idyllic, shady campground is adjacent to the Fremont River, tucked amongst historic fruit orchards. In 2018, the campground initiated a reservation system. The 71 sites are first-come, first-serve November through February. There are bathrooms, fire grates, picnic tables, and water. Park facilities are open year-round. See the park website for current fee information and a link to the camping reservation system.
Distance and Elevation Gain, Seven Hikes: 12.5 miles, 1,240 feet
Total Time: Allow two full days to drive the Cathedral Valley Loop and do all the hikes. 
Difficulty: Trails and routes are not maintained or cairned by the National Park Service; navigation ranges from easy to difficult; Class 1; no exposure; cell phone reception is unlikely; you must be able to self-rescue in an emergency; hike on a cool day and carry all the water you will need. 
Map: Hiking Map and Guide: Capitol Reef National Park
Resources: Capitol Reef National Park: the Complete Hiking and Touring Guide, by Rick Stinchfield, 2010. Excellent introduction to hikes, drives, and natural history of the park. Cathedral Loop Road Guide: A Loop Tour Through Capitol Reef National Park's Cathedral District, Capitol Reef Natural History Association, 2017. Resources available for purchase at the Visitor Center. 
Dates: October 21-22, 2021
Quote: The rooks were sailing about the cathedral towers; and the towers themselves, overlooking many a long unaltered mile of the rich country and its pleasant streams, were cutting the bright morning air, as if there were no such thing as change on earth. Charles Dickens

The fluted, west facing sheer wall of Cathedral Mountain and fantastical monolithic companions enthrall hikers on the Cathedrals Trail in Upper Cathedral Valley. (Thomas Holt Ward, photo)

Cathedral Valley, Hartnet Road (Day One)
Cathedral Valley is accessed by two roads--Hartnet and Caineville. Hartnet Road is the more southerly and Caineville Road, the more northerly. They both start from UT 24 and end at Hartnet Junction at the far west apex of the loop. This description covers the Hartnet Road portion on day one and Caineville Road on day two.
Driving Distance: This is a 93-mile circuit, beginning and ending at the Visitor Center. The Hartnet Road portion of the Cathedral Valley Loop is 31 miles, from UT 24 to Hartnet Junction, including spurs to trailheads. See the end of this post for a description of the west exit to UT 72. If that route is inaccessible, you are advised to return on Caineville Road.
Distance and Elevation Gain, Four Hikes: 7.8 miles; 700 feet
Total Time: It took us eight and a half hours for the drive and hikes.
Route: On a clear day with no threat of rain, from the Visitor Center, drive east on UT 24 for 11.7 miles. At mile marker 91, turn north at the sign for River Ford, Cathedral Valley, Hartnet Road. Reset your trip odometer to zero at this junction. The clay road is indicative of what is to come; turn around if wet. At 0.4 mile, take the left fork. 

The ford across the Fremont River is at 0.5 mile. Park and assess the integrity of the banks on either side of the river and water depth. The river was a manageable eight to ten inches deep when we crossed but the ford varies considerably. If safe, enter the river and drive downstream along the south (near) bank to avoid deeper water in the main channel. For us, the bed was firm and cobbly. Make your cut to the other side when you are across from the road leading out of the river. If you are driving the entire loop in one day, ford the Fremont in the morning since the flow generally increases during the day.

The sandy track firms up at 0.9 mile where a switchback initiates a climb through the Salt Wash, the oldest member of the Upper Jurassic Morrison Formation. This unit contains laminated sandstone interbedded with mudstone, siltstone, and claystone. Above the Salt Wash is the younger Brushy Basin member of the same formation. Easily eroded and void of plant life, low-slung hills have smooth, folded slopes brightly banded in beige, red-violet, and brick. 

At 2.8 miles, cross a cattle guard and park on a sandstone slab that has weathered into uncommon, sculptural shapes. Look over the significant Dry Wash pouroff to see the Summerville Formation below. This mudstone and sandstone layer overlies the Curtis Formation. 

Cross and recross broad and sandy Dry Wash, a north tributary of the Fremont. The countless passages into and out of arroyos on this circuit are demanding for vehicles. Elsewhere, roads were much smoother than we anticipated. At 4.8 miles, the terrain opens into a vast and flat valley, the North Blue Flats. Look west to the irregular crest of Waterpocket Fold and Thousand Lake Mountain. 

Pull off the road at the junction with BLM 0826, 7.3 miles, to check out a relic of the past--a well-digger ranchers used to provide water for their cattle. At the back end of the contraption is a complicated array of inter-locking gears. While desert sands are slowly burying the truck, water flows steadily into a wooden trough creating an artificial oasis. The park cautions against drinking the untreated water. (THW, photo)

Enter the surreal Bentonite Hills at 8.9 miles. Softly flowing, multi-colored, and void of vegetation, the hills are within the Brushy Basin unit of the Morrison. Bentonite is an absorbent swelling clay, a product of the breakdown of volcanic ash in seawater. (THW, photo)

A note about solitude. The Fremont River ford excludes most park visitors from Hartnet Road. Therefore, if you wish to stop, do so right in the roadway as we did to snap photos and to touch the crumbly, bubbly clay. Do not pull off the track. When wet, this little hill will turn into a slip and slide, impassible for all vehicles. The belated sign for Bentonite Hills is at 9.4 miles. 

Tracks spin off from the main road fairly frequently--it would be easy to get lost out there. If the road has a BLM number, it is a spur. All roads leading to trailheads are signed. At 14.3 miles, turn left on BLM 0825 for the Lower South Desert Overlook. In half a mile enter the park at a cattle guard. The spur road ends in a parking loop at 15.4 miles. 

Hike: Jailhouse Rock and Temple Rock Route (Lower South Desert Overlook)
Essence: Walk across the Lower South Desert to circumnavigate an isolated, vertically-walled, slim tower. This is a route, not a trail. Once past the overlook, the hike is best suited for experienced desert enthusiasts. 
Distance and Elevation Gain: 0.5 mile roundtrip to the overlook; 5.2 miles roundtrip to Temple Rock with 350 feet of climbing
Total Time: 2:00 to 3:00 to Temple Rock and back
Difficulty: Route finding ability is imperative. There are fragments of footpath and abandoned road but no maintained trail and cairns are few. Use landscape markers as your guides.
Route: Once past the overlook descend on an abandoned road to reach the Lower South Desert floor. Head west staying north of Jailhouse Rock. Temple Rock is visible from most points throughout the hike. Return as you came. 

From the trailhead at 5,820 feet, walk west on a closed road for 0.25 mile. A small cairn marks a land bridge leading a few steps north to the captivating overlook. The platform rests on the Curtis Formation. To the north is a thin, curving line of gray, hoodoo-generating Curtis. Nearby to the west is the massive anomaly, Jailhouse Rock. Temple Rock is the spire further out. Navajo Sandstone domes along Waterpocket Fold are but a few miles afar. Thousand Lake Mountain marks the vista boundary. 

The monoliths and fluted cliffs of Cathedral Valley are composed of Entrada Sandstone, a tawny russet color. This is a softer version of the arch-forming Entrada found in Arches National Park. Notice the Curtis layer on Jailhouse. The Curtis is the hero of Cathedral Valley. Thin but mighty, it composes the caprock protecting what remains of the Entrada Sandstone monoliths and spires. 

For those going on to Temple Rock, continue down the old dugway keeping a sharp eye out for the route as it shifts from west to north, then south. The road is severely eroded with dangerous, deep gaping holes in the middle of the track. Be hyper aware. A tall person is needed to open and close the gate. 

The landscape is highly textured and entertaining. These whimsical roadside hoodoos still stand thanks to their Curtis caps. 

The road spills out into the valley and disappears. Have a look back at where the road cuts through the cliff so you can find it on your return. The sand was graciously firm the day we hiked. Walking was friendly through little tuffs of grass and around black, volcanic boulders. 

Locate a solitary 30-foot cylinder with a pointed cone northeast of Jailhouse Rock. Flank it on the north and the old road will materialize just shy of a mile into the hike. The faint track continues due west affording a gripping look at the north escarpment of Jailhouse Rock, 6,123', lifting 503 vertical feet off the desert floor. (THW, photo)

There was not much evidence of traffic, just an occasional footprint. And yet sporadic trail fragments eventually coalesced and became clear. The path curves northwest to get around the dike-topped hill, shown. 

The trail passes through a break in the volcanic dike. The vegetation is scratchy from this vantage point to the base of Temple Rock at 2.5 miles. Walking around the monolith adds just 0.2 mile. Temple Rock exudes immense power jutting straight up from the earth for 327 feet. Perfectly horizontal sedimentary layers are another remarkable feature. We found elk prints and scat, and white selenite on the ground with long, skinny crystals. Retrace your steps keeping an eye out for the dugway descending from the overlook. (THW, photo)

Back on the main road, the curvy track drops in and out of Hartnet Draw. "The Hartnet" is relatively high terrain bordered by the cliffs framing the South and Middle deserts. The region's name honors Dave Hartnet who pioneered the route from Fremont to Caineville in the early 1880s. At 18.8 miles cross a cattle guard and reenter the park. The parking corral for the Lower Cathedral Valley Overlook hike is on the right at 20 miles. 

Hike: Lower Cathedral Valley Overlook, West Saddle 
Essence: A virtually flat hike across the desert finishes with a short, swift pitch to a saddle overlooking the temples of the Sun and Moon in Lower Cathedral Valley. 
Distance and Elevation Gain: 2.0 miles; 200 feet
Total Time: 1:00 to 2:00
Difficulty: The trail is obliterated by Hartnet Draw but once located, the footpath is well-defined to the saddle. 
Route: Cross the many channels of Hartnet Draw. Locate the trail and follow it due north to the west saddle. For advice on reaching the east saddle, please reference Rick Stinchfield's book. 
 
An accurate depiction of the ridgeline is etched onto a wooden sign leading out from the trailhead at 5,820 feet. 
(THW, photo)

The wash system wipes out any traces of the trail almost immediately. When you emerge from the last channel, search around for the path. There are no landmarks or cairns to assist. The grassy flat is thinly vegetated with greasewood, chalcedony is scattered about, and there are an exceptional number of ant hills. If you lose the trail, watch for it scaling a ridgelet below a balanced slab, shown. After exfoliating from the cliff above, the boulder managed to turn 90 degrees and come to rest on a slope, poised on a delicate point. In 2021, there was a cairned gate at the bottom of the access ridge, shown.

Arrive on the west saddle at one mile, elevation 5,980 feet. It's always a thrilling moment to crest a ridgeline and peer into a new world. This vantage point is especially riveting, soaring 600 feet above the Middle Desert. The saddle is a mere 160 feet above the tallest tower on the Temple of the Sun, shown. (THW, photo)

To see the base of the Temple of the Moon, ascend 40 vertical feet up the west ridge. The north face of the escarpment is vertical so move around mindfully. Flat-topped Factory Butte is visible in the east, image-right. Retrace your steps.

Back on the road, Hartnet Draw constricts and the track drops steeply into and out of the wash time and again; I stopped counting after ten. This is a slow passage. The first four crossings are wet from Ackland Spring. Peter Ackland was the first rancher to run cattle in The Hartnet. 

Over ten miles, Hartnet Road climbs one thousand feet and enters a mature piñon-juniper woodland. The track is rubble-filled as it reaches the high tableland separating the South Desert and Upper Cathedral Valley. For the hike to the Upper South Desert Overlook, turn left at 29.7 miles. 

Hike: Upper South Desert Overlook
Essence: A short hike to an intimate vista into the upper reaches of the South Desert and full-circle view of far distant ranges. 
Distance and Elevation Gain: 0.4 mile; 80 feet 
Total Time: 15 to 30 minutes
Difficulty: Clearly defined trail

Walk south from the parking lot, elevation 6,860 feet, on a trail lined with volcanic boulders. The rounded basalt and andesite boulders originated in 20 million-year-old lava flows that mantle Boulder and Thousand Lake mountains. The freight of boulders was hurled down from the mountains by floods and debris flows at a time when the Ice Age glaciers were melting.

The roadcut seen to the southwest provides access into the South Desert. It is closed to vehicles but open to hikers and equestrians. Arrive at a precipitous rift in the cliff providing a startling opening extending south across the desert to the Henry Mountains. Ascend south on a broad ridge to a knoll with an astounding view. The South Desert, cloaked below in the gold hues of autumn, is cradled by the the sliding east flank of Waterpocket Fold and the upthrusting Entrada rampart. On a clear day, swing around to see Factory Butte; the La Sal, Abajo, and Henry mountains; and Thousand Lake Mountain. Even Temple Rock is visible down-valley. (THW, photo)

To access the Upper Cathedral Valley Overlook, turn north (right) at a signed junction at 30.2 miles. The spur is rocky and rutted for 0.3 mile.

Hike: Upper Cathedral Valley Overlook
Essence: A short hike to a viewpoint looking out over Cathedral Mountain and a string of monoliths in Upper Cathedral Valley. 
Distance and Elevation Gain: 0.2 mile; 60 feet 
Total Time: 15 minutes
Difficulty: Braided trails

Trails spin out of the parking lot, elevation 6,900 feet, to the east and north. Take the northbound undulating trail to the observation point. The Cathedrals Trail (a Day Two hike) flanks the lineup of monuments. These Entrada remnants are at the head of the Middle Desert.  

From the end of the spur, turn right for the 0.4 mile drive to Hartnet Junction at 31.2 miles. You have three choices for returning to the Visitor Center. Driving back on Hartnet Road is ill-advised because the depth of the Fremont River is an unknown late in the day. You may finish the loop on the Caineville Road--allow a few more hours. Or, if the road west over the mountains is open and free of deep snow and mud, you can do as we did, and rejoin the pavement at UT 72. The latter option is described at the end of this post. 

Cathedral Valley, Caineville Road (Day Two)
Driving Distance: This is a 106-mile circuit, beginning and ending at the Visitor Center. The Caineville Road portion of the Cathedral Valley Loop is 36 miles, from UT 24 to Hartnet Junction, including spurs to trailheads. See the end of this post for a description of the west exit to UT 72. If that is inaccessible, you are advised to return on Caineville Road.
Distance and Elevation Gain, Three Hikes: 4.7 miles; 540 feet
Total Time: It took us seven and a half hours for the drive and hikes.
Route: On a clear day with no threat of rain, from the Visitor Center drive east on UT 24 for 18.6 miles. At mile marker 97.8 turn north on Caineville Road. Driving from the west, a sign for the hamlet of Caineville precedes the turn. Reset your trip odometer to zero at the sign for Cathedral Valley, Bureau of Land Management, Henry Mountains Field Station. Caineville Road, BLM 0082, is hemmed in by the broad floodplain of Caineville Wash and the North Caineville Reef.

At 0.2 mile, stay straight. The North Caineville Reef is composed of mudrock slope and sandstone cliff structures typical of Mancos Shale. The stark landscape bordering UT 24 between Caineville and Hanksville is a classic example of this formation named for exposures near the town of Mancos, Colorado in 1899. The surprisingly smooth dirt road crosses a north fork of Caineville Wash at 2.5 miles and climbs a hill while weaving through the Salt Wash member of the Morrison Formation. The landscape becomes ever more exotic with big boulders extruding out of Brushy Basin slopes. The track curves through massive, intensely weathered sandstone blocks, some tumbled from low cliffs and others in their original sedimentary position. 

At 5.2 miles, park on a slickrock slab to see the alluring Queen of the Wash, Point 5,434', at the south end of a gorgeous Brushy Basin bentonite ridge. The road soon comes very near the base of the banded mountain affording an arguably even better vantage point of this landmark, prized by photographers. (THW, photo)

The road becomes rougher as it winds down out of the sandstone and onto the flats of the Middle Desert.
Cross Caineville Wash for the last time at 10.6 miles, south of Black Mountain. Enter Lower Cathedral Valley, the road now the color of eroded Entrada Sandstone as it approaches the premier monoliths on this circuit.  

The left turn for the temples of the Sun and Moon is at 15.5 miles. BLM 0084 poses a small challenge as it drops into and out of Middle Desert Wash. Enter the park at a cattle guard. Pass by the turnoff for Glass Mountain. The spur road takes aim at Temple of the Sun. The shaft of stone is commanding, almost incomprehensible. For the best photographic conditions, arrive in the morning. There is no parking at the Temple of the Sun so keep going to the turnaround at the end of the road and park in the pullout at the base of the Temple of the Moon at 17.3 miles.

Hike: Temples of the Sun and Moon, Glass Mountain
Essence: The three most compelling stone features in Lower Cathedral Valley are within walking distance of each other. Circumnavigate all three on this easy stroll.
Distance and Elevation Gain: 2.0 miles; 80 feet
Total Time: 1:00 to 1:30
Difficulty: 4WD track; social trails circle the temples; navigation easy
Route: Circle Temple of the Moon then walk north on the road and orbit Temple of the Sun. Walk north on the road once again to visit Glass Mountain. Return south on the road.

From the parking pullout at 5,380 feet, begin by circling Temple of the Moon. It rises 285 feet off the valley floor. There is a use trail around the monolith; avoid stepping on biological soil crust or even leaving new footprints in the sand. We were alone out there and were met with complete silence and unimpeded power. Weathered Curtis Formation boulders are grounded on the west side. Having lost its protective cap, the standing rock is eroding away more rapidly. Touch the vertical walls and you can feel hardened mud that seeps and dribbles during heavy rain. (THW, photo)

Temple of the Moon has a curved blade reaching toward the Sun and graced by a fragile minaret. (THW, photo)

Seen from the road, Temple of the Moon looks like a rocket ship. Lower Cathedral Valley Overlook (west saddle) is image-right. 

We are unspeakably fortunate to be here in this Earth moment when these remarkable monuments still stand, the remainder of the Entrada having been stripped away by time and erosion. If the Moon is delicate and mysterious, the Sun is the big bad boy. It streams straight up off the planet for 402 feet to elevation 5,822 feet. Follow the social trail around the monolith and then get back on the road heading northeast. 

In 0.1 mile, turn left toward Glass Mountain, just 0.3 mile from this junction. A sign is posted, "All Rock Collecting Prohibited." Please do your part to protect this site. The mountain is really a blob of glass 20 feet tall, defying all reason. There is speculation that we are only seeing the summit of Glass Mountain, the bulk of it buried underground. Cemented crystals, some translucent, others gray and white striped are composed of selenite, the glassy, crystalline form of gypsum. (THW, photo)

It's not often that we are privileged to commune with three of Earth's most riveting natural monuments so effortlessly. (THW, photo)

The Caineville Road bears northwest, once again tracking along Middle Desert Wash. High clearance with good approach and departure angles is required for the multiple drops into and out of the watercourse. Little Black Mountain is north of the road. Columnar basalt sills have shed onto the Entrada creating an appealing red and black design. Eroded linear dikes stream out across the land. Dikes are formed by molten magma pushing up through fissures in sedimentary rock layers. The magma solidifies, forming vertical dikes. 

Thin sills of lava have intruded into sedimentary rock on this bluff east of the road (24.3 miles) just before reentering the park at the Oil Well Bench Road junction. 

Middle Desert constricts between fluted walls. At 28.4 miles, turn left for Gypsum Sinkhole. The one mile spur provides the best tour of intrusive volcanic dikes on the whole circuit. In places they are ejecting straight out from Entrada walls. Elsewhere, they form thin plates, clinging to the face of the sandstone. Enter an amphitheater and park.

Hike: Gypsum Sinkhole 
Essence: A short walk to a sheer 200-foot cavity.
Distance and Elevation Gain: 0.2 mile; 40 feet
Total Time: 15 minutes
Difficulty: Trail; dangerous drop is unprotected.

From parking, elevation 6,000 feet, the sinkhole is less than 0.1 mile west. Don't get your speed up. The sheer, vertical 200-foot drop off the abrupt lip is rightfully frightening. Stay well away from the crumbly edge. The amphitheater wall heightens the drama. Verticality shoots down the wall and into the 50-foot diameter hole. Stinchfield writes, "Selenite, the mineral comprising gypsum, is quite soluble in mildly acidic surface water, resulting in the grand void." (THW, photo)

Cathedral Valley Junction is just west of the sinkhole spur at 30.1 miles. Apparently this northbound track will get you to I 70 in just 27 miles but it is ultra remote with a great many random roads spinning every which way. Know before you go.  

Expect more steep pitches into and out of Middle Desert Wash. Once west of a south riming escarpment, the road curves south and enters Upper Cathedral Valley. Welcome to the land of standing stones. Drive slowly and marvel at the many unnamed monoliths. The Cathedrals Trail parking pullout is on the east side of the road at 33.5 miles. 

Hike: Cathedrals Trail
Essence: Walk along a grassy bench adjacent to Cathedral Mountain and its companion monoliths.
Distance and Elevation Gain: 2.5 miles; 380 feet
Total Time: 1:00 to 2:00
Difficulty: Trail
Route: Head northwest to trail's end on a knoll; return as you came.

A small wooden sign across the road marks the start of the trail, elevation 6,400 feet. The path climbs a grassy hill adorned with plentiful volcanic boulders and juniper. Arrive on a broad bench separated from the cathedrals by a roughly 200-foot drop into a headwater tributary of Middle Desert Wash. From here, the footpath affords a continuously evolving vista of the deeply incised sentinels. (THW, photo)

Piñon and Utah juniper laden with blue berries thrive on the parkland. We saw evidence of abundant wildlife: bear and elk scat, a snake stretched across the trail bagging sunshine, Prairie falcons soaring over Cathedral Mountain, even cougar scat. The hike turns around on a wonderful prominence at 6,740 feet after 1.25 miles. Although you can see mountain ranges off in the distance, substantial Cathedral Mountain commands attention at 6,924 feet, 384 feet off the desert floor. (THW, photo)

Below, the golden plain awaits wintering elk herds. Caineville Road punches up toward the campground and Hartnet Junction. Retrace your steps.

The short walk to the Morrell Cabin begins just 0.7 mile up the road. Listed on the National Register of Historic Places, the cabin was a seasonal camp for local cowboys from the 1930s until 1970.  

The road to Hartnet Junction is rocky and steep, rougher than any stretch thus far. We were fortunate to squeeze our Jeep around a three-foot boulder smack in the center of the track. The Cathedral Valley Campground precedes Hartnet Junction. There are six spacious and private sites open year-round, no reservations, no fees, no water, and no trash cans so pack it in and out. There are picnic tables, fire rings and a pit toilet. Bring your own wood--gathering is prohibited. Caineville Road ends at Hartnet Junction at 36 miles. 

West Exit From Hartnet Junction
Hartnet Junction is the high point of the Cathedral Loop tour at 7,000 feet. The three-way junction with the Hartnet, Caineville and Polk Creek roads is 0.3 mile southwest of the spur road to the Upper Cathedral Valley Overlook (Hartnet Road) and 0.4 mile south of the campground turnoff (Caineville Road). 

It is 11.8 miles from the junction to paved UT 72 and 51 miles to the Visitor Center. Reset your trip odometer to zero and drive west on Polk Creek Road (aka Thousand Lake Mountain Road). The first mile is rough going on cobbles and larger rocks. Volcanic boulders are piled up on either side of the road. At one mile, leave the park and enter Fish Lake National Forest. A sign reads, Elkhorn Campground 7 miles, UT 72, 11 miles. Forest Service Road 022 is a smooth and graded dirt road. It climbs steadily while bearing northwest. Below, the road takes aim on Hens Hole Peak. Soon, rabbitbrush gives way to old aspen stands and big conifers. 

The winter closure gate is 3.2 miles from Hartnet Junction. As we ascended into the mountains, there was mud and snow on the road and we wondered if our gamble would pay off. This drive provides a marked contrast with the scenery we'd been immersed in. 

FSR 022 climbs onto the east flank of Hens Hole Peak before the Round Lake turnoff. Stay on the main road topping out on a ridge at 9,400 feet, 6.6 miles. Turn right on Elkhorn Road, FSR 206 (away from Elkhorn Campground), at 6.9 miles. A sign reads UT 72, 5 miles. At the saddle between Hens Hole and Geyser peaks, FSR 206 swings west. The steep and curvy downhill plunge is well graded. Sagebrush seas are flanked by aspen and conifer. 

Allow 50 leisurely minutes from Hartnet Junction to UT 72. Turn left and pass through the town of Fremont. In Loa, take UT 24 East back to the Visitor Center.