Essence: This climb possesses all the criteria necessary to qualify as one of the finest desert adventures detailed in this blog. As a point of confusion for many, the peak "Pinnacle Ridge" is the highest point on "extended Pinnacle Ridge" which runs southwest to northeast for many miles in the Santa Teresa Mountains. While the summit is an unconsolidated assemblage of massive boulders, with a prominence of 2,490 feet the peak is visually striking from great distances. Hike among weather-sculpted granite spheres, towers, buttresses, gendarmes, slabs, and outcrops scattered throughout the chaotic landscape. The trailhead is remote and the 4WD track is a test for any vehicle. Navigation is challenging. Finish with a series of seriously exposed Class 4 moves tempered by a rock surface with sticky, crystalline features. The peak is seldom visited and suggested for desert mountaineers--the mountain has defeated many competent hikers. The hike is within the Santa Teresa Wilderness managed by the Coronado National Forest.
Travel: From the corner of Klondyke Road and Bonita-Klondyke Road, drive east on well-graded Klondyke Road for 5.4 miles. Turn left at the sign for "Sand Tank, 4 Miles" and measure distance from there. The spur to Sand Tank on FSR 677 requires a serious 4WD vehicle with high clearance and good approach and departure angles. There are deep ruts and steep pitches in the dirt road. There is a generous pullout at the beginning of FSR 677. We parked one vehicle there and piled into two Forerunners. Both bottomed out several times. At the branch at 1.7 miles, turn right. At 2.3 miles, stay straight. Open and close two gates. Park in a turnaround at 3.9 miles by a yellow warning sign, "Entering burned area..." Park on Arizona State Trust Land. Note: Some people have initiated the climb from Devil's Hole but a quick examination of the road via satellite implies it is considerably longer and truly horrible.
Distance and Elevation Gain: 6.8 miles; 2,900 feet
Total Time: 6:00 to 8:00
Difficulty: Off-trail; navigation challenging; Class 4 with serious exposure; rope recommended; avoid sizzling heat in summer and snow and ice in winter.
Total Time: 6:00 to 8:00
Difficulty: Off-trail; navigation challenging; Class 4 with serious exposure; rope recommended; avoid sizzling heat in summer and snow and ice in winter.
Map: Buford Hill, AZ 7.5' USGS Quad
Date Hiked: March 29, 2024
Poem:
Date Hiked: March 29, 2024
Poem:
Instructions for living a life:
Pay attention.
Be astonished.
Tell about it. --Mary Oliver
Pay attention.
Be astonished.
Tell about it. --Mary Oliver
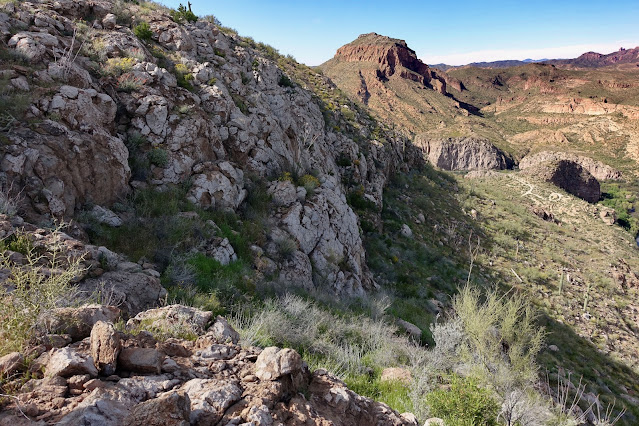
The 26,780-acre Santa Teresa Wilderness was set aside in 1984 to celebrate the weathering forces of nature. This wilderness is so remote it is rarely witnessed by humans. And yet wind, water, and time have sculpted formations so beautiful the stone itself rejoices. Pinnacle Ridge is the highest and rightmost point in this image.
(Thomas Holt Ward, photo)

Route: Walk north up Cottonwood Canyon. Leave the wash and ascend northwest to Point 6,161'. Hike over the top of Point 6,420' (blue-line) or flank it on the west. Bear northwest along the relatively flat divide between Limestone Canyon and Devil's Hole. Do an ascending sidehill traverse to gain extended Pinnacle Ridge west of the saddle and east of the peak. Hike west, staying as close to the ridge as possible. Pitch up a broad passageway. Squeeze through a crack in boulders and arrive in a grotto on the north side of the peak. From there it is Class 4 to the summit.

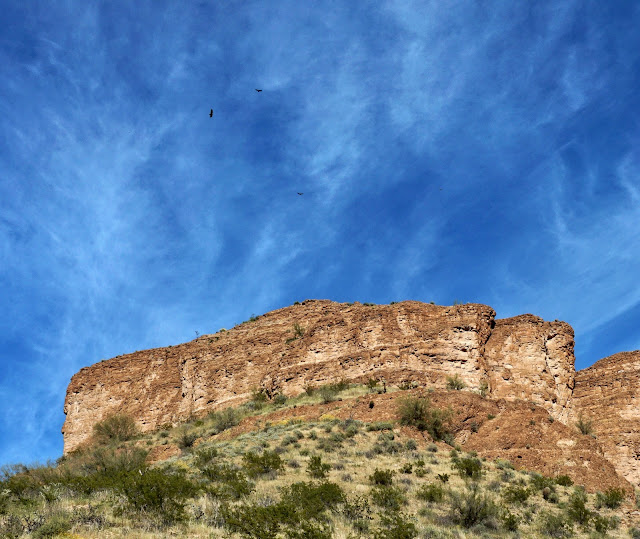
Pinnacle Ridge is visible from the parking circle at elevation 5,300 feet and throughout the approach. The incoming road continues briefly to the boundary with Coronado National Forest. Open and close the gate.

Just past the gate is a trailhead sign on the banks of Cottonwood Canyon creek. In times gone by there was a functioning trail system on routes kept open by cowboys driving stock. We learned from hikers who have climbed Cottonwood Mountain that the trails have fallen into disuse and have almost entirely disappeared. Looking at our track, apparently we walked right past Sand Tank but did not see it.

We made our way up the flowing creek, stone hopping across a couple of times. We enjoyed a sweet interlude through a sycamore forest.

The first route objective is the saddle between points 6,161' and 6,420'. We made an attempt on Pinnacle Ridge with the Southern Arizona Hiking Club (SAHC) a year earlier. Their route started up Limestone Canyon and then broke for the saddle. Although the drainage was pretty easy initially, it got worse as we clawed our way up to the saddle in a boulder-choked gully infested with catclaw. Determined to improve on that route, we left Cottonwood Canyon at 0.45 mile and headed northwest up the first gentle ridge that comes down on your left, the southeast ridge of Point 6,161'. It's going to cost you about 180 feet each way but it avoids serious annoyance.

The ascent is pleasant, the grade moderate, the footing good, and foliage is never an issue. Below, climbers are approaching Point 6,161'. You may cut the corners on the rollers and prominence if you wish.

Arrive on Blue Ridge at 1.3 miles. From there, get a good look at what's ahead. Point 6,420' is a little hard to make out in this image because it is sitting in front of spire-topped extended Pinnacle Ridge. You may either climb Point 6,420' or contour on its west side. Either way, you need to achieve the soft shoulder northwest of the prominence at about 6,300 feet.

Drop into the saddle between points 6,161' and 6,420' at 1.5 miles, 5,980 feet. Devil Tank in Devil's Hole is visible to the southwest. While this is a viable starting location for this hike, I can't vouch for the integrity of the 4WD track into the Hole.

From the saddle, ascend the southeast slope of Point 6,420'. Our group in 2024 had no interest in topping the little bonus hill.

Point 6,420' qualifies as a "Club Peak" for SAHC. They regard it as the "high point of Blue Ridge." This image was shot from the prominence in 2023. From my field notes, the top yielded an "...astounding view of massive granite structures, great clumps of stone, spheres, and towers." From there, the route goes over the divide in the center of this image. Then it pitches up to extended Pinnacle Ridge hitting it just left of the tower seen below, west of the saddle.
On that day in 2023 the group turned around at 6,500 feet because one member
wasn't up for continuing. That was a major disappointment given the four hour drive
from Tucson and camping in sub-freezing conditions in Klondyke. So we
returned with four veteran desert and high mountain climbers from Colorado.

For those skirting Point 6,420', at about 6,300 feet cross over a barbed wire fence and start contouring, tracking along the fence line. You want to just head a gully coming up from Devil's Hole. Of note, you will cross a geological contact line on the southeast slope of Point 6,420'. The hike begins in metasedimentary gneiss
and schist. The rock from here on is composed of intrusive, igneous granite.

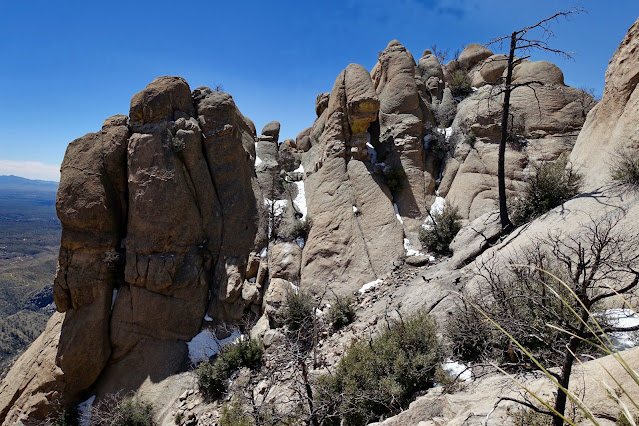
Assuming you did the contour, arrive on the shoulder of Point 6,420' at 1.9 miles. Look ahead to the most chaotic and difficult section of the route to navigate. The next half mile is relatively level on a low divide running north-northwest with a significant drop into Limestone Canyon on the east and Devil's Hole on the west. Little rivulets run here and there. The objective is to stay near the middle of the divide. Walk to the east of the first major stone mass, pictured.
The Desert Mountaineer climbed Pinnacle Ridge in 2013 under infinitely more punishing conditions. Every step was encumbered with manzanita and other foliage. Please link to the website for an excellent story and images. What a difference a fire makes. In June, 2021, the Pinnacle Fire burned 34,417 acres. On our hike we walked through scorched terrain, barging easily through Arizona rosewood. We could see and enjoy the creatures in the stone world.

As we walked, we didn't know exactly which feature on the peak was the highpoint. We had to get up there and sort it out.

Walk across a flat on the west side of a buttress with a gigantic slab of stone that broke loose from its mother rock and is now sliding forever further away.

Here's another view of that orientation landmark and erosion in action.

We made a gentle, slight descent and crossed a creek running southwest into Devil's Hole at 2.4 miles, 6,260 feet. Below, the saddle east of the peak is image-right. There is no reason to go there. Rather, we did a pitched side hill climb toward the two pinnacles west of the low point, shown. The pinnacle on the right is on the ridgeline, the other slightly lower.

We stopped shy of the saddle and cut west between the two pinnacles. (THW, photo)

This hiker is hefting up the rising traverse into the space between the pinnacles. (THW, photo)

We took a break between the pinnacles at 2.8 miles, 6,780 feet.

This photo was taken of the climb to come from there. It looks complicated and it is.

We arrived on the ridge at 2.9 miles, 6,860 feet, just west of a massive stone block, image-left. (THW, photo)

The ridge itself is disorganized. Moving west there are a lot of obstacles. Stay as close to the ridgetop as possible, bypassing on the south when necessary.

The route to the peak goes up through a passageway, a broad chute, between two massive buttresses. (THW, photo)

The passage is preceded by another friction pitch on bedrock. This image shows off the rough texture on the granite that is an assist in the climbing to come. (THW, photo)

We went up the center of the chute. The passage is very steep. Moist soil worked to our advantage. (THW, photo)

Emerging from the chute we were greeted by this enchanting outlier. How does the Earth sculpt these anomalies? (THW, photo)

We paused to reconnoiter. We were at an inflection point with the summit block above our heads to the north.
(THW, photo)

The outcrop to the south seen from this same location is the decorative top of the extended buttress on the south side of the passageway.
Turn north and continue climbing for a short bit. The peak was visible above our heads but we still hadn't parsed that.

Squeeze through a crack. (THW, photo)

Step into a grotto immediately below the peak to the northwest. In this image we are taking a lunch break after we mounted the summit. (THW, photo)

Where is the peak in this jumble of massive boulders? We knew we were practically on top of it for we were in compact terrain. Our group paused in the grotto while one member went off searching for the way upward. He intuitively nailed it. His head is in the photo directly above my camera.

To reach the summit, cross the grotto and start ascending at the only place you can climb higher. My partner with the red backpack is where you want to be.

The first move is a Class 3 friction pitch with a couple of options for mounting. This is followed by a series of exposed Class 4 moves.

Turn right and stem a lengthy crack.

The crack is much more airy than these images let on. There is a sense of infinite air under the butt-feet stem my friend is doing. The snow-filled slot that followed was a safe reprieve. (THW, photo)

The crux is the final pitch up a 1.5 foot-wide ribbon of rock. It is so steep we were working the limit of our ability to stick to the rock. This last move is in a very exposed place. If you fumble, you're gone.

Mount the high point of Pinnacle Ridge at 3.4 miles. The top is three feet wide and ten feet long with vertical drops to the north and south. There was just room enough for the six of us to sit in the order of our arrival. It was flat and comfortable. The peak register was placed in 2,000. We were the first visitors in 2024. (THW, photo)

As expected, the field of vision rippled off into the blue distance. Looking westward, snow capped Mount Lemmon is on the horizon beyond the Galiuro Mountains.

Pictured below, my partner is descending the crux. He was at the limit of traction and risked loosing his grip on the rib. Even at 5' 10" he couldn't quite stretch to the safety boulder without a hop. By the way, Mount Turnbull, the highpoint of the Santa Teresa Mountains and the San Carlos Apache Indian Reservation is seen in the north.

Feeling a rope taut around my waist made all the difference.

On the return we made almost no route changes and basically unwound ourselves. Below, we are plunge-stepping back down through the passageway. (THW, photo)

We enjoyed walking upon rock lying down.

We concluded our hike in desert grassland with Mount Graham in the Pinaleño Mountains framing the backdrop.
(THW, photo)

We saw one little patch of redmaids, some verbena, and bajada (or scarlet) lupine. (THW, photo)

Reportedly, black bear, mountain lion, mule deer, coatimundi, and javelina live in the Santa Teresa Mountains. We did not see any wildlife other than birds on our hike. However, on our drive back to Tucson that evening we saw a herd of pronghorn in the Aravaipa Valley just off the Bonita-Klondyke Road.