Essence: From the highway this landmark peak looks unscalable for all but the
technical climber. And yet, there is a safe route for solid Class 3
scramblers. Seen from the west one might imagine the square summit block to be cube-shaped, but in reality it's a narrow rib of stone with 2,098 feet of prominence. The climb is well covered in trip reports and a social trail leads to a cairned route. But still, we missed a crucial and abrupt jog in the approach and chewed up a lot of time looking for passage. This post seeks to mitigate any ambiguity in the way forward. Good scrambling and navigation skills are required. I would joyfully welcome the opportunity to repeat this climb, a tribute to the magnificence of this mountain. An alternate route directly up the seriously exposed 400-foot vertical front wall is discussed at the end of this post. Castle Dome is within the Kofa National Wildlife Refuge managed by the U.S. Fish and Wildlife Service.
Travel: A 4WD vehicle with high clearance and good approach and departure angles is required to reach the trailhead. US 95 runs north from Yuma on I-8 to Quartzite on I-10. A few yards south of mile marker 55, leave the highway on the Castle Dome Mine Road (signed Kofa National Wildlife Refuge, Castle Dome). This is a gentle right branch for travelers coming from the south and a sharp hook left for those coming from the north. Measure distance from there. Pavement ends at 1.8 miles. To begin, the gravel road is wide and well graded. Enter the refuge at 4.9 miles. At 6.9 miles turn left toward McPherson Pass. "No Vehicle" signs on either side of the road protect desert pavement. There is plenty of dispersed camping elsewhere, including two sites tucked against the base of the mountains (11.8 miles). The narrow two-track isn't too rocky but there are serious dips in and out of washes and the road is high-centered. At 9.2 miles the track doubles back on itself--keep going! Continue until there is an opening in the cliffs and a major wash system. Park at 13.6 miles where metal stakes block travel up the wash. Our vehicle underestimates mileage. It took us 36 minutes to travel from the highway to the trailhead.
Kofa National Wildlife Refuge: The refuge is located in the
southwest quadrant of Arizona, between I-10 and I-8. The 666,640 acre
refuge was established in 1939 for the protection of desert bighorn
sheep and other native wildlife. Both the Kofa Mountains and Castle Dome
Mountains are within the refuge and are further protected by the Kofa
Refuge Wilderness. There are no fees or facilities. At-large camping is
allowed--bring all the water you will need. The refuge is named for the King of Arizona gold mine which operated in King Valley between 1896 and 1910. Of historical interest, soldiers stationed at Fort Yuma in the 1850s named the peak Capitol Dome. The name morphed over the years to Castle Dome.
Distance and Elevation Gain: 6.2 miles; 2,100 feet
Total Time: 5:00 to 6:30
Difficulty: Wash walking; trail, cairned route; navigation challenging; Class 3 with mild exposure; carry all the water you will need and hike in cool-weather months.
Map: Castle Dome Peak, AZ, 7.5' USGS Quad
Date Hiked: March 3, 2024
Poem:
To understand the world
knowledge is not enough,
you must
see it,
touch it,
live in its presence
and drink the vital heat
of existence in the very heart
of reality.
Pierre Teilhard De Chardin
Great sheets of flat and uniform desert pavement on the Castle Dome Plain come to an abrupt end at the foot of the violent mass of volcanic Castle Dome Mountains. The scrambler's route is hidden from view on the back side of the consolidated volcanic block.

Route: The route roughly bears southeast to the base of the monolith and then scales the northeast face to the summit. For clarity, I have partitioned the trek into three segments: the obstacle-free walk in the wash; the approach up the debris apron to the stone "Sphere" at 3,220 feet; and the Class 3 scramble to the summit. Each segment will take 45 to 60 minutes. Note: the Castle Dome Peak quad uses 20-foot contour intervals.

The Wash Segment (1.7 miles, 330 feet of gain)
Several washes draining the west slopes of the Castle Dome Mountains come to meet in the flats by the parking area at 1,700 feet. The stream beds are gravely and free of vegetation and large rock. You'll make fast work of this segment provided you get started up the correct wash. I passed by the vehicle barrier stakes and blithefully started marching up the wrong drainage system.

We sorted this out on our return. At 0.1 mile, leave the initial wash and follow a pathway northeast into the main drainageway. A cairn may (or may not) assist. The unnamed wash swings to the southeast and holds that trajectory to the approach trail.

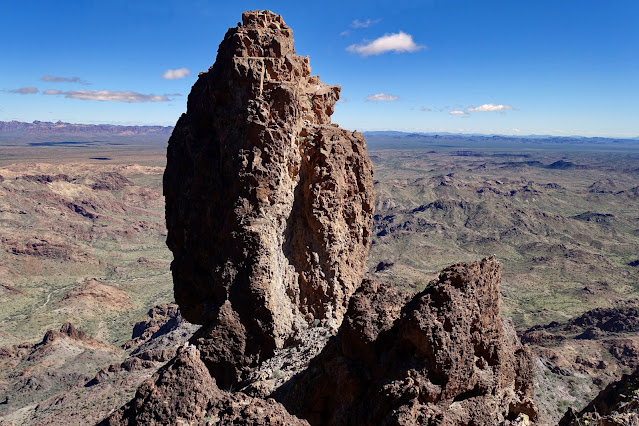
The correct wash passes on the north side of a massive two-pronged heavy fin, seen below. Castle Dome is at the center of the image. The pinnacle to the left of the mountain is the most important landmark and navigation feature. The route goes between the slim tower and the peak.

Mudstone walls contain the streamway. There are two circular arches in the vertical rhyolite wall on the left at 0.6 mile. The geology of the Kofa National Wildlife Refuge is a typical volcanic
mix of basalt, andesite, dacite, and rhyolite. Bedrock comes to meet itself at 0.9 mile for a few blissful steps. Outside the channel are signature plants of the Sonoran Desert--saguaro, ocotillo, paloverde, barrel cactus, beavertail prickly pear, and brittlebush. Nothing was blooming; we were ahead of spring.

Debris Apron Approach to the "Sphere" (1.0 mile, 1,200 feet of gain)
Leave the wash at a gateway cairn, 1.7 miles, elevation 2,030 feet. Judging from trip reports the exact location for exiting the wash has evolved over the years. This particular route is highly efficient. The social trail ascends the embankment to a bench and then weaves between shiny black and brown volcanic boulders holding a southeast trajectory.

Cairns guide onto a narrow, two-foot-wide rim walk. The structure is eroding and further narrowing. I found this incredibly amusing.

Follow the cairned trail up the north slopes of the mountain to the Sphere indicated below.

The mellow grade and welcome trail is simply delightful to begin. This image looks back from the ascent trail.
(Thomas Holt Ward, photo)

Typical of a classic apron, the terrain steepens and gathers more rubble as it closes in on the flanks of the mountain. The trail passes through a notch in a fin buttress at 2,700 feet. The black and sharp rhyolite features jutting from the slope in such a powerful manner quickens the heart. What is to come? (THW, photo)

Below, my partner is standing in the notch. We've just gotten started and already the relief off the desert floor is visually remarkable.

Past the fin, footing is loose but there is sufficient stable rock to shove from. The trail passes to the left of a subsequent dark fin. It's a good idea to make mental notes of these features because the trail is braided and harder to peg on the descent.

At 2.7 miles, 3,220 feet, you will arrive at the Sphere, my informal name for this unmistakable solid stone pockmarked feature. Be sure to climb the Sphere, both for shear joy and to analyze the route to come.

From the Sphere, the Kofa Mountains stand tall to the north of the chaotic and chromatic Castle Dome Mountains.

Sphere to Summit (0.4 mile, 570 feet of gain)
As seen from the Sphere, the trail climbs to the base of the wall on the northeast side of the mountain. It skirts below a cluster of standing stones and then enters a notch between the detached pinnacle and the peak.

Abut the wall at 3,240 feet. This monolithic mass looks very much like the intimidating west face but thankfully, there is a weakness on this back side that favors safe passage. (THW, photo)

There is a growing sense of exposure but most climbers will consider it mild from here to the summit. Wrap just to the outside of the cluster of towers, shown. (THW, photo)

After passing the standing stones, stay tight to the base and look for cairns leading into a notch to the right of the free-standing, 60-foot pinnacle.

Here's a better perspective on the notch you must enter. We are off-route in this image. You should be snuggled up against the row of stones.

The real climbing begins within the notch. It is a Class 2+ friction pitch requiring some fancy footwork.

This image looks down the notch. Gain the tiny saddle between the pinnacle and the mountain. (THW, photo)

There are two routes to the summit that initiate from the notch. Some climbers have gone from the saddle directly up the crack, pictured. It's rated Class 4 by some and Class 5 by others. It was more than we wanted to tackle and since I have not gone that way, I can't recommend it. But if it looks like your thing, consult Stav Is Lost for illustrative photos.

For the Class 3 scrambler's route, back down the notch a few paces and locate a four-foot-wide chute across from the pinnacle's base at 3,470 feet. This is the navigation crux and perhaps the climbing crux for some. On our first pass up the notch, we blew right by the hard right hook into the slot. We killed a considerable amount of time and effort scrambling all over the area looking for a viable route. Eventually we reclimbed the notch and there it was. Yes, the chute is cairned but those pesky rock piles are easy to overlook. (THW, photo)

The 20-foot chute is a sweet little step up with solid rock nubbins for hand and foot holds. One trip report ranks this slot Class 4 but I didn't need a spot or a hand or a shove and I was giggling all the way up and down, a personal gauge for Class 3.

From the top of the pitch make for a small cave with an arched entrance.

From there, follow cairns across a lateral to the south.

You will be adjacent to the pinnacle, our ever faithful navigation landmark. The absolute power and beautiful form of this earth pillar is mesmerizing.
The route up the northeast face is sinuous and complicated. Follow cairns faithfully even when the way seems counter intuitive. Up, down, around, and through. (THW, photo)

The entire upper face is a low Class 3, super fun scramble. Stone is mostly well seated and while the slope is high angled, exposure remains mild. (THW, photo)

Develop an eye for the cairns--they tend to blend into the surrounding rock. Can you find it in this photo?

Over the years footsteps have created a white slash through burnished rhyolite.

Contact the summit ridge and the view corridor to the south opens to reveal a conundrum of spires and nameless shapes with a fierce beauty that typifies the landscape in the Kofa Refuge. (THW, photo)

Walk north on the boulder strewn ridge to the highpoint of the Castle Dome Mountains at 3.1 miles. The ridge is surprisingly slim but there's plenty of room to move about. (THW, photo)

The peak register located in an ammo box was stuffed. We couldn't locate the Castle Dome Benchmark but we did find the No. 1 Reference Mark placed in 1964. (THW, photo)


Looking northeast, the Castle Dome Mountains ripple softly away and hatchet-edged Polaris Mountain makes its pronouncement across King Valley.

Make a mental note of where you contacted the ridge so you can initiate your descent in the same place.

We found it wise to descend on our upcoming route because it worked so well. Things could go wrong in a hurry on the steep pitch and we paused frequently to confirm together that we were on the right track.

In this image, our friends have done the short lateral to the north and are standing at the mouth of the cave mentioned earlier. (THW, photo)

From the cave (image-left), descend directly to the top of the crux chute.

I hadn't climbed the Sphere on the ascent so I scampered up on our return. It was harder to keep track of the braided trail as we descended the debris apron and the rubble pile slid underfoot. (THW, photo)

The walk down the wash was fast and enhanced by brilliant rhyolite walls.

The Front Wall
This is the route detailed by the Desert Peaks Section of the Sierra Club. Our friend and proven navigator, John Bregar, led my partner and four friends from Colorado up what I am informally calling the "Front Wall" on March 4, 2023.
(THW, photo)

Initially, they headed up toward the saddle southwest of the peak. As they approached the saddle, they moved left to walk right along the base of the cliff (above the saddle). Look for cairns that lead directly up through small weaknesses in the wall. (THW, photo)

Follow unreliable cairns or find your own route up the wall to make progress. (THW, photo)

Exposure is serious all the way to the top of the near vertical cliff. This route is solid Class 4 for an extended period. (THW, photo)

The group of veteran desert climbers celebrate on the summit. (THW, photo)

1 comment:
Thanks for the nice hike report from Kofa. I love that area! I think you may have a copy/paste error in the driving directions where you write "AZ-85 runs north from Gila Bend on I-8 to Buckeye on I-10". I believe you're actually intending to describe U95 between Yuma and Quartzsite. Regards
Post a Comment