Essence: Ibex Peak is northeast of Quartzite in the Plomosa Mountains, a dispersed range running north-south. The short hike worked well as an interlude on a long road trip. The peak is memorable for its 1,082-foot prominence and a perpendicular scarp about 400 feet tall. There are several viable approaches to the one mandatory pinch point--a Class 2+ gully with a couple of low Class 3 moves. Both of our routes are discussed below, one more chossy than the other. The hike pairs well with Haystack Peak, close by to the northeast, but we were thwarted by rain. The origin of the name is unknown. Ibex are goats found in Eurasia and Africa. The males have large recurved horns. Did someone mistake a desert bighorn sheep for an ibex? The hike is on Arizona State Trust Land. A short road section on private land with abandoned mining works can be avoided.
Travel: From Main Street in Quartzite drive north on AZ 95 for 5.8 miles. Turn east on Plomosa Road following a sign for Bouse Community Park. Measure from the turn onto paved Plomosa Road. The open country is administered by the BLM and there is plenty of dispersed camping on desert pavement. Turn right at 8.0 miles. It is a good gravel road to start. At 8.3 miles cross a wash. There are a maze of roads. At 8.7 miles cross another wash. At 8.8 miles bear left on BLM 0076. The road is slow, rocky, and reasonably high clearance is needed for the stony high center. At 9.3 miles bear right. At 9.8 miles, turn left. Go up and over a short hill and park at 11.6 miles at the boundary with Arizona State Trust Land. Display your permit. We found the driving track on Peakbagger and needed it.
Distance and Elevation Gain: 3.2 miles; 1,400 feet
Total Time: 3:00 to 4:00
Difficulty: 4WD tracks, primarily off-trail; navigation moderate; low Class 3; no exposure (unless you tempt the edge); hike on a cool day and carry all the water you will need.
Map: Ibex Peak, AZ 7.5' USGS Quad
Date Hiked: February 13, 2025
Quote: Life is wonderful. It's a gift to be alive, to see the sun and breathe the air. And there isn't really anything else. Michael Crichton, The Lost World
The idled mines, the rain-laden cloudscape and black barrier wall lent a lost world quality to this short but spectacular hike. (Thomas Holt Ward, photo)

Route: From parking, we began by walking south on a mining road. Our objective was the northwest ridge of Ibex. We avoided the initial crunchy ridge by hiking up a draw. We followed our intuition to the ridge, hitting it at 2,300 feet. Walk east to the gully and mount south to the summit block. Follow the cliff edge to the highpoint. On the return we dropped off the northwest ridge to the north and followed the vagaries of the landscape until we encountered a mining road. We walked northwest to our vehicle. Climbing Haystack? Take our descent route to 1,800 feet and start cutting east.
Route: From parking, we began by walking south on a mining road. Our objective was the northwest ridge of Ibex. We avoided the initial crunchy ridge by hiking up a draw. We followed our intuition to the ridge, hitting it at 2,300 feet. Walk east to the gully and mount south to the summit block. Follow the cliff edge to the highpoint. On the return we dropped off the northwest ridge to the north and followed the vagaries of the landscape until we encountered a mining road. We walked northwest to our vehicle. Climbing Haystack? Take our descent route to 1,800 feet and start cutting east.

The road to the start of the hike offers the best perspective on Ibex Peak. The pronounced knob is the pivot point on the summit block. Haystack Peak is image-left.

From parking, elevation 1,500 feet, Haystack Peak has two distinct knobs. The highpoint is on the left. To do the Ibex Peak loop as described, walk south on the mining track. Sonoran regulars covered the bajada sparsely--creosote, saguaro, teddybear cholla, ocotillo, and paloverde. The desert was parched, there were no blooming flowers, and we hoped rain would materialize.

Stay straight at 0.3 mile. The right branch goes to a drill hole. The northwest ridge of Ibex tempts (image-center) but it looked troubled so we entered the draw at its base.

The bedrock in the wash is water-sculpted and colored in shades of raspberry. Those blissful steps lasted only for a brief moment. Follow the draw southeast.

The image below looks back down the draw as we were just getting started. The climb mounts 1,200 feet in the next mile--steep but not ridiculous. (THW, photo)

The landscape looks chaotic and it is--a mishmash of small ridges and gullies. However, the route is fairly intuitive. At 2,000 feet we turned south and made for the northwest ridge.

Ibex Peak is composed of volcanic rock, a mix of basalt, andesite, and dacite, each a different type of magma. Absent is the glassy rhyolite that forms towers and fascinating volcanic features seen in the Kofa National Wildlife Refuge to the south. At 2,100 feet we found a collection of small caves.

As we closed in on the ridge it was steep and loose enough to be described as chossy.

At 1.1 miles, 2,300 feet, arrive on the northwest ridge. A flat covered in teddybear cholla precedes three massive buttresses. They, in turn, stand in front of the imposing south-facing wall of Ibex Peak. This whole dynamic, including the mystery of "now what?" was a highlight of the hike for me. As it happens, the route crosses under the buttresses and engages the access gully right against the escarpment.

The one and only cairn was placed at the start of the crossover. There were signs of use in the constricted passage. It never felt treacherous or exposed. Stay as close to the base of the buttresses as is reasonable. (THW, photo)
Bump into the wall at 1.2 miles, 2,400 feet. Considering the gully is mandatory for summiting Ibex, we are fortunate it is within the capabilities of most off-trail desert hikers. It is a steep Class 2+ rubble pile to start, with some catclaw thrown in for fun.

Looking back, we are about half way up the ramp. I found it helpful to sneak along the wall bracing against it or using it for select hand holds. (THW, photo)

We favored mounting the bedrock instead of the loose material in the center. There are a couple of low Class 3 moves near the top, a welcome little scramble.

This image looks down on the gully from the point of emergence. (THW, photo)

Exit the gully at 1.3 miles, 2,600 feet. (THW, photo)

We were effectively on top of the massive summit block from here on. What follows is a mellow, exhilarating climb, albeit teddybear cholla infested.

All the drama is along the edge but you can easily shun it if you wish. The serious drop feels almost overhung.
(THW, photo)

The rimrock is not stable. Beware of cliff suck! (THW, photo)

At the top of the initial slope is the pivot point we saw from the drive in. The climb finishes with a ramble southeast to the highpoint. What a hike!

There are big boulders on the summit ridge but no obstacles.

Arrive on the stony summit at 1.5 miles. (THW, photo)

It is becoming rare to find historic peak registers. We were delighted to find the register in a red can tucked in the peak cairn. It was placed in 1984 by five climbers. You can read their note that the highpoint in the Plomosa Mountains is Black Mesa, West, 3,639', south of I-10. The mountain has only a couple of visitors each year. Surprisingly, they hail from states scattered throughout America. Is it the Quartzite nomad effect?

This image looks south to Black Mesa. To its right and further south is Ten Ewe Mountain and Signal Peak in Kofa.

Northeast, Haystack Peak is shorter than Ibex but a significantly greater challenge. Stav is Lost has an excellent description in words and photos for making your way from Ibex to Haystack. Of course, you'll have to retreat back down the gully before you even think about a second peak. (THW, photo)

On the summit ridge there is an opening that looks down on a free-standing rock stack with an intriguing ramp and the triangular mass that sits in the saddle between the peaks. The traverse over to Haystack passes below the massive gendarme on the west. (THW, photo)

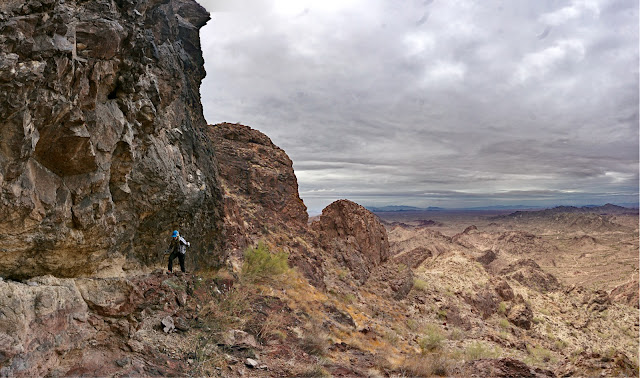
For the descent, scoot down the gully and once again flank the three buttresses. Looking at this photo from my office it looks like I'm about to get mowed down by that dominant wall. (THW, photo)

We passed the cholla flat, staying on the ridge for a short distance. At 2.1 miles, 2,240 feet we cut north on a route we scoped from the summit.

For those going on to Haystack, if you start heading east at 1,800 feet, shown, you'd be able to traverse under the triangular prominence in the saddle.

Our return route comes down the slope on image-right. From this perspective it looks like you could shortcut directly up the steep slope to the access gully. But then you'd miss the ultra cool cholla flat and the three buttresses.

The route down was ultra smooth. We were simply aiming for a mining track. If anything, the descent route was less discombobulated than the ascent. I like the loop concept because we got to experience more of the mountain.

We were on the road at 2.5 miles, 1,600 feet. (THW, photo)

We passed by a hefty cave with a small opening in the back wall.

There was a crumbling stone building just before the parking area at 3.2 miles. Lost world indeed. It was raining lightly as we finished up the short but pleasurable hike. We got back on the road and were in Tucson before nightfall.
(THW, photo)

No comments:
Post a Comment